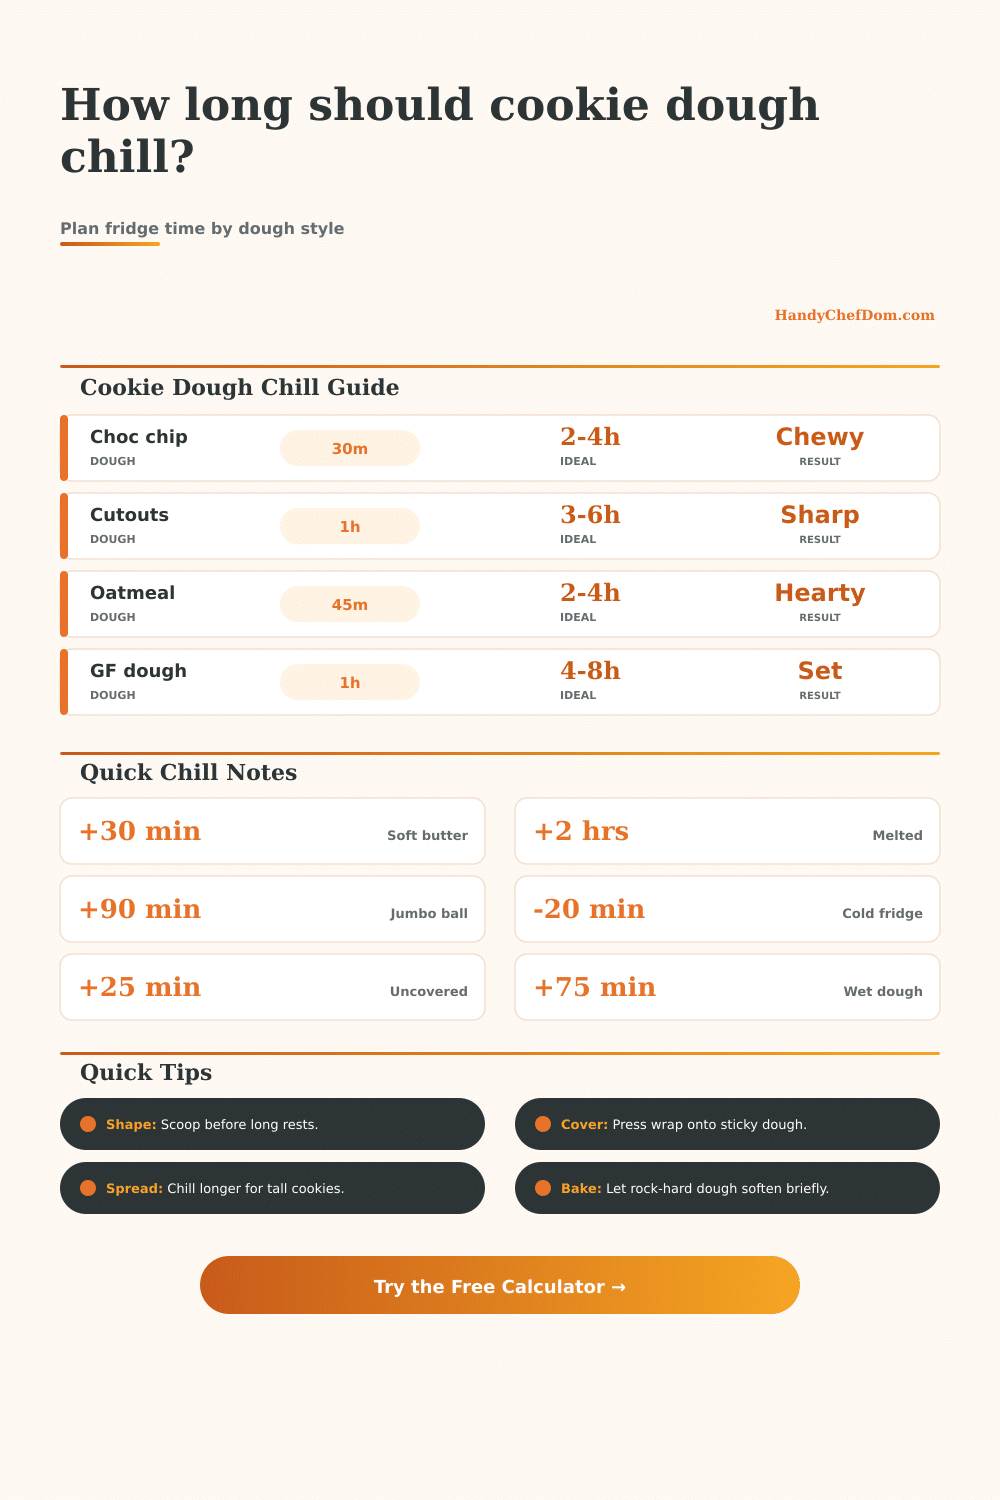
Estimate fridge chilling time from dough style, batch weight, butter temperature, hydration, dough ball size, fridge temperature, covering method, sugar type, add-ins, and bake goal.
✨ Cookie Dough Presets
🥣 Fridge Chill Inputs
Set the dough profile and fridge conditions. The calculator models how fat temperature, flour hydration, dough mass, uncovered surface drying, sugar style, and add-ins change the time needed before baking.
Use the average scooped ball, rolled piece, or log slice weight.
Optional. Used to show the latest ideal fridge start time.
Minimum Fridge Chill
0 min
safe starting point
Ideal Chill Window
0 hrs
best bake texture
Latest Start
Set date
optional deadline
Spread Control
0/100
balanced
Cookie Dough Fridge Chilling Breakdown
Dough base0 min
Butter temperature0 min
Batch and ball size0 min
Hydration adjustment0 min
Fridge temperature0 min
Cover and surface0 min
Sugar and add-ins0 min
Target bake result0 min
Recommended range0 min
Portion estimate0 cookies
Texture expectationBalanced
Deadline statusNo deadline set
🧁 Dough, Method, And Tool Comparison Grid
Drop Dough + Scoop
2-4 hrs
A cookie scoop on a covered tray chills individual balls quickly and keeps portions even.
Cutout Dough + Rolling Pin
3-6 hrs
Rolled sheets need enough fridge time for clean cutter edges and easy transfer.
Slice Log + Wrap
4-12 hrs
A tight log wrap helps the outside and center firm at a steady pace.
Wet Dough + Spatula
4-8 hrs
Sticky doughs hydrate and firm more slowly, especially in a deep bowl.
📏 Dough Size Conversion Grid
0.5 oz
Mini Ball
About 14 g or 1 level tablespoon.
1.0 oz
Small Ball
About 28 g or 2 tablespoons.
1.5 oz
Medium Ball
About 43 g or 3 tablespoons.
2.5 oz
Jumbo Ball
About 71 g and usually needs extra chill.
📘 Reference Tables
Dough Type
Minimum Fridge Time
Ideal Fridge Time
Best Bake Result
Chocolate chip drop dough
30 minutes
2 to 4 hours
Chewy center with controlled spread
Sugar cookie cutout dough
1 hour
3 to 6 hours
Cleaner cutter edges and easier lifting
Oatmeal cookie dough
45 minutes
2 to 4 hours
Hydrated oats and hearty chew
Shortbread dough
1.5 hours
4 to 8 hours
Tender snap and less slumping
Brown butter cookie dough
2 hours
4 to 12 hours
Set fat and deeper flavor
Gluten-free cookie dough
1.5 hours
4 to 8 hours
Better hydration and less grit
Gingerbread dough
2 hours
6 to 12 hours
Firm spice dough for neat shapes
Slice-and-bake log dough
2 hours
4 to 12 hours
Clean slices from a firm log
Butter Temperature
Ideal Shift
Spread Effect
Calculator Note
Cold cubed butter
15 minutes faster
Lower spread
Fat starts firm, but dough may need mixing warmth to relax.
Cool room-temperature butter
No shift
Balanced
Use as the standard base for most drop dough.
Very soft butter
Add 30 minutes
More spread
Extra fridge time helps the fat firm before baking.
Melted butter
Add 2 hours
High spread
Chill until dough is scoopable and no longer glossy.
Warm brown butter
Add 2.5 hours
High spread
Warm fat needs time to set throughout the batch.
Cooled brown butter
Add 75 minutes
Moderate spread
Flavor develops well with a longer rest.
Hydration Or Add-In
Chill Shift
Best Use
Texture Cue
Low hydration dough
10 minutes faster
Shortbread and crumbly dough
Firm but not rock hard
Standard dough
No shift
Classic cookie formulas
Cool and scoopable
Soft sticky dough
Add 1 hour
Extra egg or high moisture dough
No longer sticky to the touch
Gluten-free hydration
Add 2 hours
Rice, oat, or starch blends
Less gritty after resting
Chocolate chips or chunks
Add 10 minutes
Drop dough
Cool pieces help shape hold
Stuffed centers
Add 75 minutes
Filled bakery cookies
Center feels firm before baking
Fridge And Cover Method
Time Shift
Surface Effect
Best For
34 to 36 F refrigerator
15 to 25 minutes faster
Fast firming
Large dough balls and warm butter dough
37 to 39 F refrigerator
No shift
Standard chill
Most home baking plans
40 to 42 F refrigerator
Add 20 minutes
Slower firming
Covered trays and overnight rests
Airtight covered container
No shift
Low drying
Drop dough and meal prep batches
Uncovered short chill
Add 25 minutes
Dryer surface
Brief emergency chilling only
Double wrapped overnight
15 minutes faster
Protected surface
Flavor development and next-day baking
Scoop before long chilling: Portion drop dough before a long fridge rest so every ball chills evenly and the cold dough is not difficult to scoop later.
Cover for better texture: Keep dough covered unless you only need a very short emergency chill. Covered dough firms without drying on the outside.
Calculator estimates are practical home-baking planning ranges. Very rich doughs, unusually warm mixing bowls, and oversized filled cookies can still need extra fridge time.
Whether your cookies turn out to be flat regrets or tender disks has everything to do with structure. And chilling cookie dough. But when you’re impatient (or distracted), you know: You should of chill it. And maybe you figure if the internet says 30 minutes will do, then 30 minutes will do.
Now you don’t have to guess, was your batch too big? Was your butter too soft? Plug in your own numbers into calculator above and let it handle the math.
How to Chill Cookie Dough
Cool fat mean less spread. If the butter melts in the oven, it will cause the cookie to flow out and lose its shape. Putting it in fridge firms that fat up again so the sugar has time to dissolve and the flour can start to set before the fat melts too much.
How long this takes very much depends on how your ingredients are when you put them in. Did you melt your butter? Then you’ll want a lot longer in the fridge different than if you began with some cube of cool butter. Butter is great for taste, but not so much for instant structure. That’s why many times you end up with a thin cracker-like edge and a thicker bakery-like middle.
Hydration is another surprisingly important part of the equation. The higher the water content in your dough, the more time it takes to firm up during the rest. That’s true whether you’re using extra egg or other wet add-ins like brown butter.
You need the cold to reach the heart of the dough ball, not just its outer shell. The outer layers might be rock-hard while the center is still soft. This cause them to stretch during baking even though the outer layer stay rigid. That means an odd shape and then a bake that won’t be even.
Scoop out individual balls early on, before a long rest. Then the thermal mass of each one are smaller, and the fat can get nice and set evenly (without needing to sit overnight first).
The other thing to know about the clock is the type of sugar used. Doughs made with a lot of brown sugar are softer because it has more moisture than granulated or white sugar, so they need more chilling time before they’re stable. Remember: watch the moisture if you want a chewy texture. Chilling it for half an hour may firm up the top but the inside will still be loose.
On the flipside, a dry shortbread dough made mostly with cold butter and not too many liquids will set up quicker. Again… It’s all about how liquid/solid fat work together.
Even though it’s something we rarely think about, the environment does matter. The colder your refrigerator, the quicker your dough will chill; thirty-four degrees runs cooler then the one hanging around forty-two. While it may sound small, that half a degree of temperature change will affect how fast the inside of a big log of dough hardens. For example, this makes a big difference when making giant jumbo balls or slice-and-bake cookies (if your fridge is too warm), that dough may stick to slicer blade because it didn’t firm up enough in the center.
Properly covering your dough keeps the outside from drying out and cracking as it bakes. It also holds some warmth in. An airtight container will often benefit from a little more time chilling.
It’s all about knowing when your dough is the right temperature: firm enough to retain its form but not too cold that it refuses to spread at all. Controlled spread is what you’re looking for, not no spread. And the chart on the page spells it out nicely for various kinds of dough (delicate sugar cutouts don’t need the same treatment as oatmeal or chocolate chip).
Let the cold do the work, trust the timing, and respect the fat. Your cookies will reward you with deep flavor, better texture, and shape you imagined while mixing the dough.