In that pan of batter? All you see is a pool of goo. Not a single ball of cookie dough to be found in there. The stuff smells great, the mix of sugar, butter, eggs, and flour goes well together, but once you subjected them to any kind of heat, it collapsed on itself.
More often than not, the reason for a flat patty instead of a high-rise chewy cookie have little to do with sugar or the flour. It’s nearly always due to time. Time to cool things down and solidify a raw dough so it can hold its shape.
How to Chill Cookie Dough Correctly
Plug in your variables and the calculator take care of the rest. No more guessing: do I have enough time for this? Do I have too much time for this?
It accounts for things most home bakers don’t think about, things like how moist is your sugar, what’s the status of your butter? What kind of dough are you making? Is it something dense, like gingerbread? Or delicate different than a sugar cookie? The tool sets up a baseline based off your selection. Then it refines that baseline with your inputs.
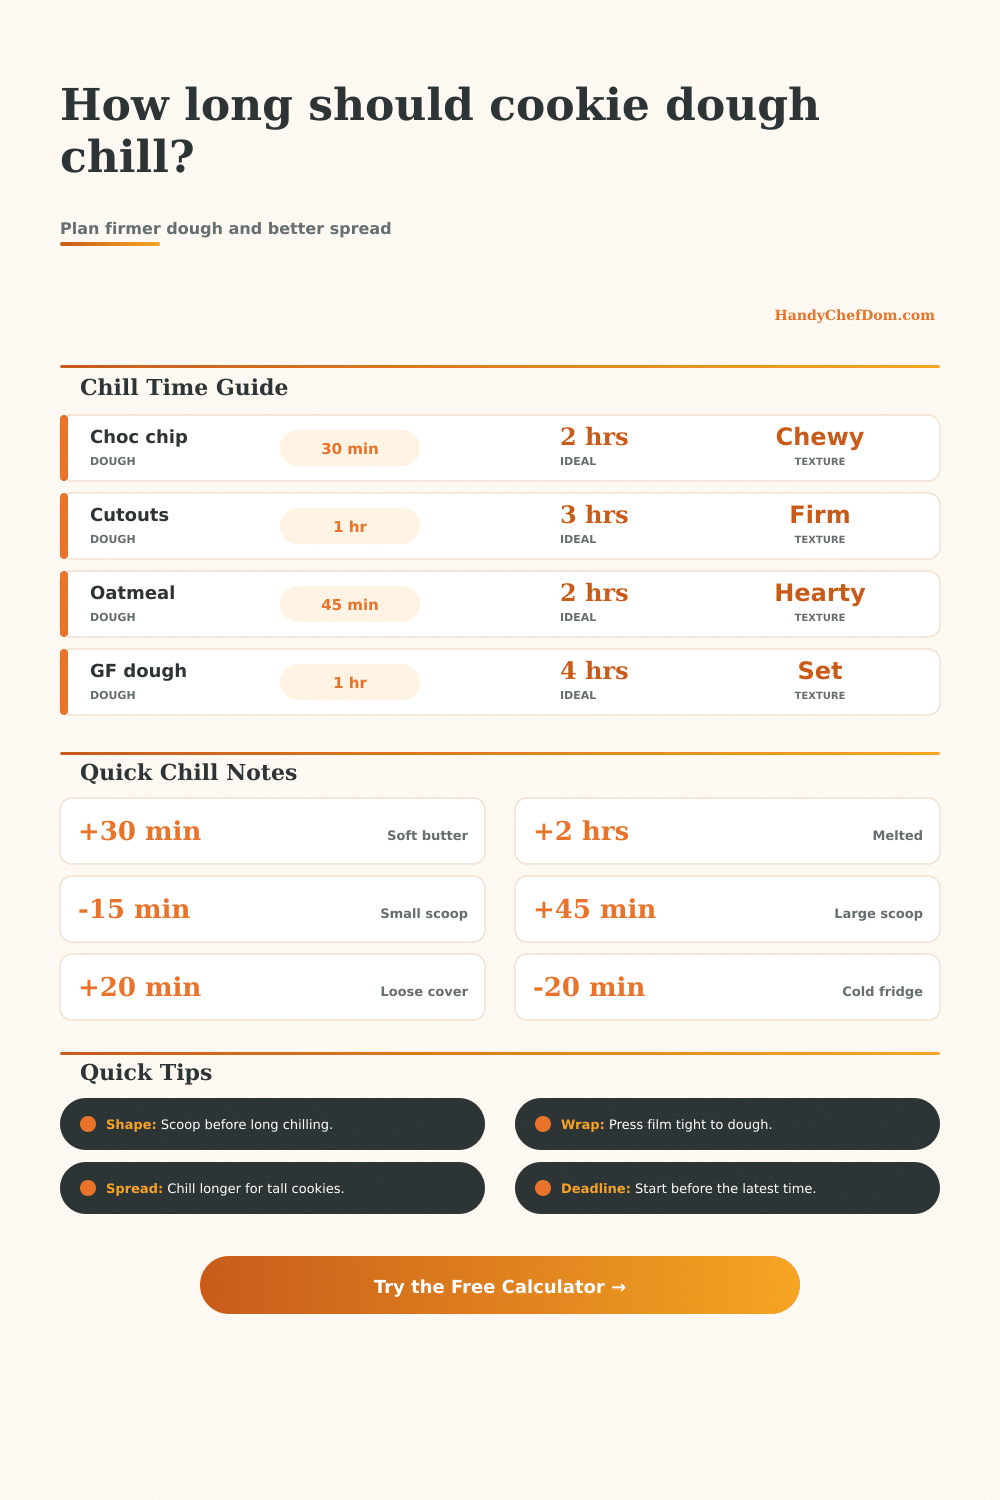
Did you use cold cubed butter? That will knock some time off because there is a lot of structural integrity. Did you melt your butter? It will add a bunch of time because now we’ve got some fat that’s already broken down and needs to set back up.
Your intuition typically doesn’t help you here. Chill doesn’t mean chill (as in cool down the dough), it’s a way of re-hydrating flour and re-solidifying fat. As the butter melts into the dry ingredient, it makes the dough sticky and soft. By chilling, the butter hardens back up. These barriers keep the dough from spreading too fast in the oven. Flour also absorbs the liquid and strengthens the gluten network to be strong enough to hold the cookie together without being tough.
This gives you a solid score that tells you how your dough will hold up. If you have a low score, expect spread. If you have a high score, you’re good to go.
The size of your scoop has a bigger impact then you’d expect. A jumbo bakery style scoop takes far longer to chill than a tiny one-tablespoon portion. Why? Because heat radiates outward; even once the outer layer of a big ball of dough has firmed up, the inner core stays warm for a long time. The mass effect is accounted for by the calculator.
Portioning small cookies means baking them sooner. Thick treats with thick centers requires that core to cool down evenly, otherwise the inside will be raw when the outsides burn.
The other knob you twist is the wrapping method. If you loosely wrap dough in a bowl, it will start to dry out on the exposed surfaces, which results in an unevenly baked hard shell. That’s why we press plastic film right onto the dough surface; so that drying isn’t happening. And because it’s not insulating with a cushion of air between the dough and the cold fridge, it chills down a little faster.
For all this, see table of references on the page. It details how various storage methods move things around for you.
There’s also sugar in the equation. Sugar levels affects moisture and how much the dough spreads, giving you another choice to make. It also depends on what kind of sugar you use. Brown sugar makes it chewier, but it needs extra time to set. The longer it stays in the fridge, the moister it gets. Powdered sugar doesn’t absorb as much; it affects the end result completly.
There’s even a place for entering your desired bake time, and the calculator will let you know whether it’s time to bake now, or go ahead and do it later.
It is a real-world approach to a problem for people who want answers, not theory, to save their baked goods. You should of planned ahead. Waiting doesn’t have to be a passive thing. Chilling is an active step in the baking process that determines your end product’s texture. The time spent chilling it is not wasted; if you rush it, you’ll be disappointed. By planning for it, each cookie emerges as you’d envisioned it.
Once the dough forms, that’s when the timer begins. Let it chill. Let the oven take care of the rest.