🍎 Apples in Oven Dehydrating Time Calculator
Estimate oven apple dehydrating time from apple variety, slice thickness, oven temperature, convection or fan use, tray load, door vent, humidity, pretreatment, and target texture.
Set apples in a shallow single layer on parchment or a wire rack. This oven calculator assumes low heat and periodic checks because home ovens cycle, hold humidity, and vary in fan strength.
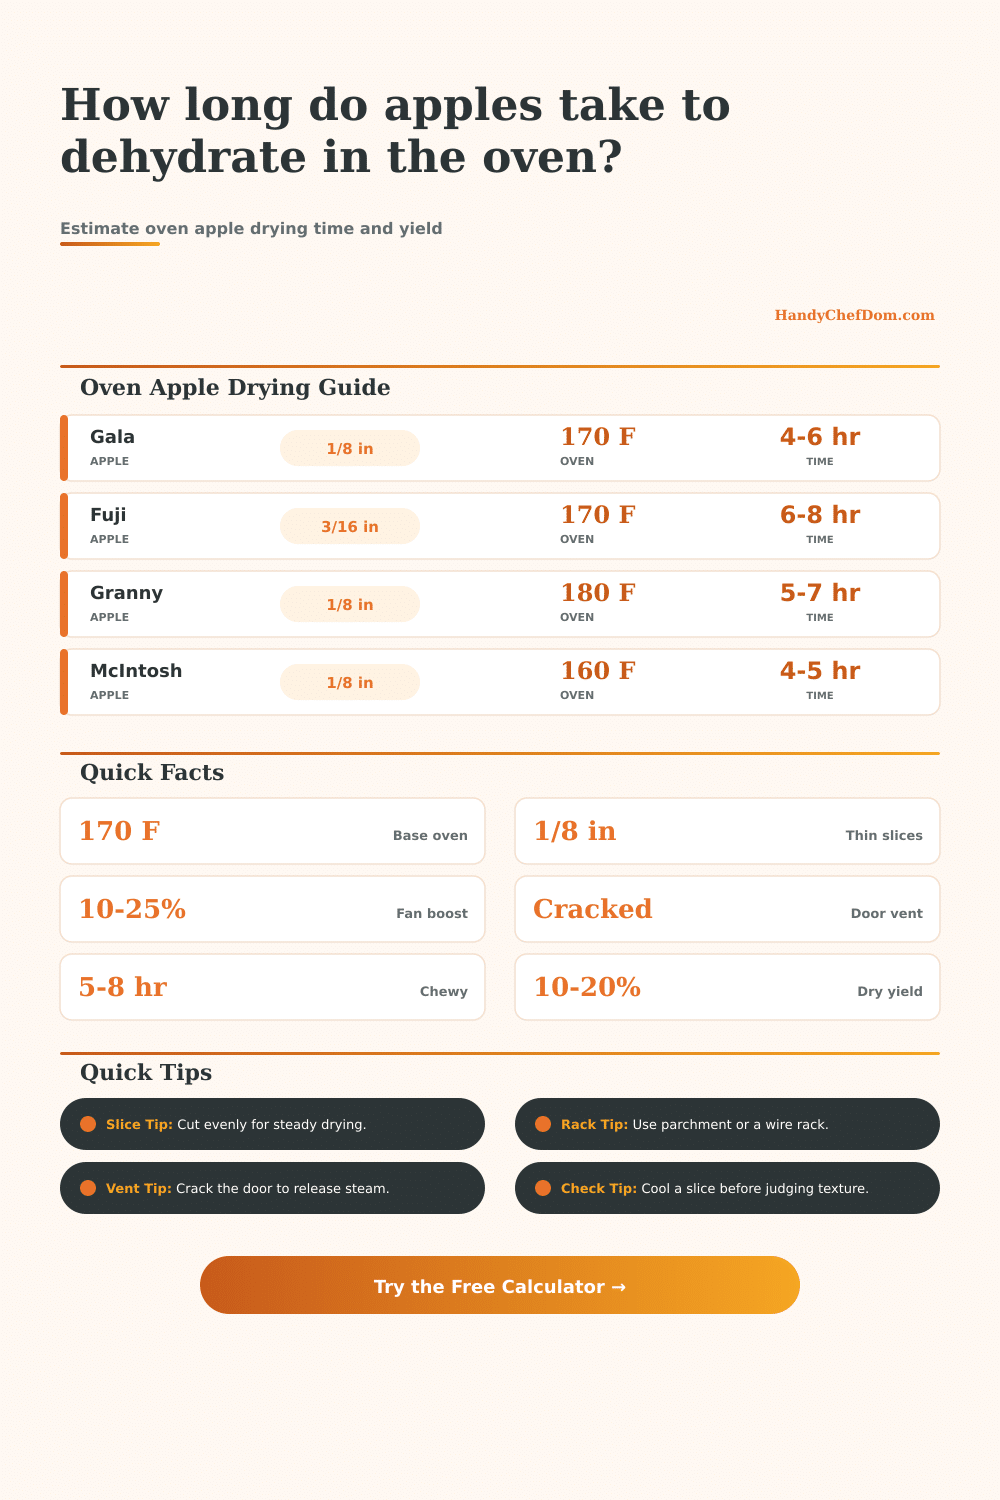
| Apple Variety | Typical Moisture | Base Time at 170 F Oven | Oven Texture Note |
|---|---|---|---|
| Gala | About 84% | 4.5 to 6 hours | Balanced sweetness and dependable rings. |
| Fuji | About 84% | 5.5 to 7 hours | Dense, sweet flesh usually needs more oven time. |
| Honeycrisp | About 85% | 5 to 6.5 hours | Juicy slices benefit from fan airflow. |
| Granny Smith | About 84% | 5 to 6.5 hours | Firm tart slices hold shape well for chips. |
| Pink Lady | About 83% | 5 to 6.5 hours | Firm slices work well for chewy texture. |
| McIntosh | About 86% | 4 to 5.5 hours | Softer flesh dries quickly but handles gently. |
| Golden Delicious | About 85% | 4.5 to 6 hours | Soft sweet slices brown easily without dip. |
| Braeburn | About 83% | 5.5 to 7 hours | Dense tart-sweet slices suit chewy drying. |
| Slice Thickness | Best Oven Cut | Target Texture | Typical Time Effect |
|---|---|---|---|
| 1/16 inch or 1.5 mm | Chip slices | Crisp chips | About 25% faster than the 1/8 inch baseline. |
| 1/8 inch or 3 mm | Rings or half-moons | Leathery snacks | Standard oven baseline for flexible slices. |
| 3/16 inch or 5 mm | Half-moons | Chewy slices | Often 35% to 45% longer than 1/8 inch. |
| 1/4 inch or 6 mm | Small wedges | Chewy or soft | Can nearly double time because centers stay moist. |
| Diced small pieces | Small cubes | Soft dry pieces | Varies by cube size and pan crowding. |
| Matchsticks | Thin strips | Fast snack pieces | Fast if separated with clear airflow. |
| Oven Setup | Airflow Method | Speed Effect | Planning Note |
|---|---|---|---|
| Still oven, closed door | No fan, trapped steam | Slowest | Moisture lingers, so add time and check more often. |
| Still oven, cracked door | Manual tray rotation | Standard | Good baseline for most home ovens. |
| Fan-assisted oven | Gentle air movement | Moderately faster | Useful when the oven fan is mild or intermittent. |
| Convection oven | Steady fan circulation | Fastest | Start checking earlier because edges dry first. |
| Wider vent gap | More moisture escape | Slightly faster | Works best if the oven still holds low heat steadily. |
| Batch Setup | Tray Load | Humidity | Expected Adjustment |
|---|---|---|---|
| Open single layer | Light | Dry kitchen | Time may shorten by 10% to 20%. |
| Standard snack batch | Single layer | Normal kitchen | Use the calculator estimate as planned. |
| Full sheet pans | Edges close | Normal kitchen | Add about 15% to 25% drying time. |
| Crowded trays | Overlap risk | Humid kitchen | Add 30% or more and rotate trays often. |
| Sweetened dip | Any load | Any kitchen | Sugar can make slices feel tacky longer. |
| Crisp chip target | Any load | Any kitchen | Plan extra time beyond leathery dryness. |
Once you start preserving food at home, though, your kitchen begins to smell different. No longer does it smell like a meal in progress; now it smells like concentrated autumn. Now there’s a bowl of sliced apples, an oven turned on to its lowest reliable temperature, and a hope that you’ve got the timing right.
Most folks approach dehydration like cooking: they set the timer, walk away, and voilà! It is perfect. Rarely does it work out that way. Oven dehydration isn’t something ovens is made for; they’re designed to hold heat, not move air. Getting moisture out of things are an awkward use for them. Understanding what your particular appliance is doing to those slice often makes all the difference between a leathery snack and a moldy mess.
How to Dry Apples in Your Oven
Plug in your slice-thickness and which variety you’re drying, and the calculator above do the rest of the math for you. No more guessing about relationship between airflow and humidity. Sure, apple is apple, but a Fuji is denser then a McIntosh, and has different sugar content, so it’ll dry faster (or slower) than some other varieties. Thicker slices retains moisture longer, so they’ll create a gradient: the inside will be slightly raw, while the exterior is crisp. If you’re looking for that even chewy texture, consistency in your slice-thickness trumps the specific temperature dial. A mandolin’s helpful here, but even a sharp knife and a steady hand can beat out a jaggly cut any day of the week.
The other major factor here is oven mechanics. Standard ovens has a heating element that cycles on and off; so, the interior of your oven will vary greatly from moment to moment. When you close the oven door, steam accumulates within. In effect, you’re steaming your apples instead of drying them. By cracking open the door an inch, we can release some of moisture while maintaining most of the heat. A tiny tweak, but it’s enough to change physics of the space. The tool takes this into consideration and lets you choose how you want to vent. Does your oven use a convection fan? Does it rely solely on air circulating via a cracked door in a still oven? The tool accounts for this by letting you select your venting style. To make something tasty doesn’t require a pro dehydrator, but it does require understanding the constraints of your stove.
Another variable that changes things is pretreatment. Slicing then dipping into some lemon water prevents browning and brings a small amount of acidity to the surface of the chip, but it also introduce a little more water. The additional moisture must be removed from the apple before it will really dry out, which means it take longer in the oven. To save time, some people skip this (and instead have their apples turn dark and oxidize). They are fine to eat but they do not look very appealing. Aesthetics vs. Speed. In this case, if you’re going to gift them, the dip is worthwhile; if you’re chopping ’em up for your own lunchbox, maybe the color doesn’t matter.
The other thing that will surprise you is the yield. Because fresh apples are mostly water, and water evaporates when dried, the apples shrinks by huge amounts. For example, you may have started with a two and a half pound batch of prepared apples, which yields only half a pound of finished product. That seems like such a waste! But really, you’ve increased not only the flavor but the shelf life. This chart on the page (the reference table) spells it out. See how each texture corresponds to a certain end weight? Knowing this can help you plan better. To play it safe, you might want to double the amount of fruit you start with.
And then there’s storage: Are the apples still warm to the touch, too fleshy? No, they’re not ready for storage yet. Do they feel crisp and cool to the touch? Or are they already leathery all the way through, flexible but with no sign of moisture on the surface? Good; go ahead and put them away. Anything you store when it’s still wet will soon develop mold in the jars. Wait until they’ve cooled thoroughly, then seal them up.
The oven helps get things started; time should of finished the trick. Weeks from now, when you open that container, the flavor had better be good, not flat-tasting and limp, but alive and vibrant. That’s why we respect the drying curve, right? Actualy, it’s naturaly moddern to use a convection fan if you want more luxurius results.